Archive for category Uncategorized
Note to self: Management endpoint for Azure Gov Cloud
Posted by sseely in Uncategorized on January 29, 2023
This is just a note for me and anyone else who may need this.
The Azure Management APIs are all documented to use management.azure.com as a base URL. When you need to access the same URLs over AzureUSGovernment cloud, the base URL changes to
management.usgovcloudapi.net. At least, that change happened for the CognitiveService which I had soft deleted, tried to purge, and had to resort to REST APIs because the gov cloud for CognitiveServices can lag public cloud by many months.
Anyhow, it took me about 30 minutes to find this magic URL, so I’m passing it along to you.
One other helper note: if you need the access token to execute some management APIs from Postman (or similar), you can get the authentication token after a call to az login by using this command:
az account get-access-token
Then, just paste the value from the accessToken field into the Authorization header as:
Bearer <contents of accessToken>
Example to generate the whole string and echo things out correctly via a bash shell:
access_token=$(az account get-access-token --query accessToken -o tsv) && echo "Bearer $access_token"
Sick of posts saying “capitalist is best”
Posted by sseely in Uncategorized on July 14, 2022
Really getting tired of the “bought a jet” story that ends with this morale: “Capitalism is freely giving your money in exchange for something of value.
Socialism is taking your money against your will and shoving something down your throat that you never asked for.”
Pure capitalism is profit maximizing and doesn’t look at the societal ills which it causes including exploitation of fellow humans.
Pure socialism levels the playing field too much and takes away the benefits of risk + reward, leading a society to stagnate.
A blend of the many political ideologies makes a society work. I’ll ignore libertarians, anarchists, communism, and others for now, but rest assured they are all needed for balance.
Socialism recognizes that some things should be communally owned goods because the profit isn’t present even though we want these things: public schools, roads, fire departments, police, water treatment, regulation + inspection to maintain actual building, product, home, and workplace safety.
Capitalism provides the incentives to try new things and be rewarded. Our patent system is meant to allow inventors to recoup their investment while recognizing that ideas should go into the public domain eventually.
No one I know wants pure capitalism, socialism, libertarianism, communism, anarchy. Purity of these points of view results in optimal outcomes for a few, bad results for the rest. We do want a blend of ideologies and need to recognize when adding an anarchist, libertarian, socialist or capitalist idea will benefit all of us.
Legalized alcohol balances a number of these ideologies: libertarian policies let me decide how much to drink so long as I don’t hurt others. Socialist policies fund police to watch for when I and my fellow humans use alcohol and then operate heavy machinery (car) while under the influence. That same socialist bit also makes sure that factors of production have a means to be transported and that the facilities which manufacture the alcohol are safe to work in and producing product up to “healthy” standards. Capitalism improves the quality of alcohol and ensures I have a variety of options to choose from.
In the US, I think we should be adding ambulance rides, recurring prescriptions for chronic conditions, to the list of socialist policies for everyone. Likewise, some post-secondary education should be added– I’d like to value a medical doctor higher than a degree in Egyptology since one scratches an itch, the other helps eliminate the issue causing the itch:)
createUiDefinition.json: Selecting existing resources
Posted by sseely in Uncategorized on July 19, 2021
I was asked how to use two controls from Create UI definition elements – Azure Managed Applications | Microsoft Docs:
The first control displays a list of resources of a given type and is quite handy. The other calls an Azure REST API and delivers the results. There is no default way to display the results; you need to couple the ArmApiControl with a display if you want to show any values. I wrote the following little createUiDefinition.json file to demonstrate how to use these against something many actively used Azure Subscriptions contains: storage accounts.
All the information is on a blade called bladeData. The first item uses the “easy” path. The second uses the ArmApiControl paired with a dropdown. Both display the list of storage accounts in the customer subscription.
{
    "$schema": "https://schema.management.azure.com/schemas/0.1.2-preview/CreateUIDefinition.MultiVm.json#",
    "handler": "Microsoft.Azure.CreateUIDef",
    "version": "0.1.2-preview",
    "parameters": {
        "basics": [

        ],
        "steps": [
            {
                "name": "bladeData",
                "label": "My blade",
                "elements": [
                  {
                    "name": "resourceSelector",
                    "type": "Microsoft.Solutions.ResourceSelector",
                    "label": "Available storage accounts (Resource Selector)",
                    "resourceType": "Microsoft.Storage/storageAccounts",
                    "toolTip": "Select a storage account from the available list.",
                    "options": {
                      "filter": {
                        "subscription": "onBasics",
                        "location": "onBasics"
                      }
                    },
                    "visible": true
                  },
                  {
                    "name": "armApiControl",
                    "type": "Microsoft.Solutions.ArmApiControl",
                    "request": {
                      "method": "GET",
                      "path": "[concat(subscription().id, '/providers/Microsoft.Storage/storageAccounts?api-version=2021-04-01')]"
                    }
                  },
                  {
                    "name": "providerDropDown",
                    "type": "Microsoft.Common.DropDown",
                    "label": "Available storage accounts (Arm API)",
                    "toolTip": "Select a storage account from the available list.",
                    "constraints": {
                      "allowedValues": "[map(steps('bladeData').armApiControl.value, (item) => parse(concat('{\"label\":\"', item.name, '\",\"value\":\"', item.name, '\"}')))]"
                    },
                    "visible": true
                  }
                ]
            }
        ],
        "outputs": {
            "resourceGroup": "[resourceGroup().name]",
            "location": "[resourceGroup().location]"

        }
    }
}
Showing costs in Azure Managed App createUIDefinition.json
Posted by sseely in Uncategorized on March 8, 2021
Some Azure Managed Application publishers have ARM templates which cause their ARM template to vary in cost. To help reduce sticker shock, those publishers want some way to show how choices in the deployment will influence the cost to run the application. Getting this value is not trivial. Depending on many factors, the costs will be different for different users. Azure prices change based on a variety of conditions:
- Commitment to use Azure expressed in a contract with Microsoft will provide different discounts based on the dollar value of that commitment.
- Customer may purchase Azure through a Cloud Service Provider who discounts Azure usage.
- Customer may be paying full, advertised price.
- And so on…
At the time of this writing, no mechanism exists to find the customer prices for resources. That said, you can give a customer an idea of how much one resource type will cost: you can show them the costs for VMs. It is pretty common for an ARM template to create a variable number of virtual machines based on application parameters. In these kinds of templates, the virtual machine count can dominate the costs for running that managed application. Many partners want a mechanism which enables them to show how much those VMs will cost. While you cannot query the value directly, you can display the information to the user via a control in your createUIDefinition.json: use a SizeSelector. How would this work in practice?
Let’s assume something quite basic: a user picks an integer value from a range. In this case, the ARM template will scale the VM count linearly with the integer: one VM for every 2 units. If we have the following Slider declared:
{
    "name": "unitCount",
    "type": "Microsoft.Common.Slider",
    "min": 2,
    "max": 100,
    "label": "Units",
    "subLabel": "",
    "defaultValue": 5,
    "showStepMarkers": false,
    "toolTip": "Pick the number of units",
    "constraints": {
        "required": false
    },
    "visible": true
}
Then we can let the user know how many VMs will be created and display that as a TextBlock where the text value is:
"text": "[concat(string(steps('ApplicationCharacteristics').unitCount.value), ' was selected. ', string(div(steps('ApplicationCharacteristics').unitCount.value, 2)), ' VMs will be created.' )]"
Finally, we can add the SizeSelector to show the cost of each VM which is allowed. Many of the ARM templates with this kind of setup will constrain the selection of VM to 1-4 different sizes. We will do that by limiting the information displayed to the user by using the allowedSizes constraint.
{
    "name": "sizes",
    "type": "Microsoft.Compute.SizeSelector",
    "label": "Size",
    "toolTip": "",
    "recommendedSizes": [
        "Standard_D32_v4",
        "Standard_D48_v4",
        "Standard_D64_v4"
    ],
    "constraints": {
        "allowedSizes": [
            "Standard_D4_v4",
            "Standard_D16_v4",
            "Standard_D32_v4",
            "Standard_D48_v4",
            "Standard_D64_v4"
        ]
    },
    "osPlatform": "Windows",

    "count": "[div(steps('ApplicationCharacteristics').unitCount.value, 2)]",
    "visible": true
}
We can now show the user how much each VM will cost. The user still needs to do some math to convert the cost per VM to an overall cost. The SizeSelector will display the user’s costs, and now the user can get an idea for what the VM cost component of the managed application will be.
Please note: when running in the Create UI Definition Sandbox, the Size Selector may return Cost/month of Unavailable in some cases.
To try this on your own, try using the Sandbox and paste in the following createUiDefinition.json:
{
    "$schema": "https://schema.management.azure.com/schemas/0.1.2-preview/CreateUIDefinition.MultiVm.json#",
    "handler": "Microsoft.Azure.CreateUIDef",
    "version": "0.1.2-preview",
    "parameters": {
      "config": {
        "basics": {
          "description": "Sample UI Definition which uses a SizeSelector to estimate price",
          "resourceGroup": {
            "allowExisting": true
          }
        }
      },
      "basics": [],
      "steps": [
        {
          "name": "ApplicationCharacteristics",
          "label": "Pick some characteristics of your application",
          "subLabel": {
            "preValidation": "Select your options",
            "postValidation": "Done"
          },
          "bladeTitle": "Application options",
          "elements": [
            {
              "name": "Infoenvironment",
              "type": "Microsoft.Common.InfoBox",
              "visible": true,
              "options": {
                "icon": "Info",
                "text": "For every 2 units, we add one VM to the deployment."
              }
            },
            {
                "name": "unitCount",
                "type": "Microsoft.Common.Slider",
                "min": 2,
                "max": 100,
                "label": "Units",
                "subLabel": "",
                "defaultValue": 5,
                "showStepMarkers": false,
                "toolTip": "Pick the number of units",
                "constraints": {
                    "required": false
                },
                "visible": true
            },
            {
                "name": "unitDisplay",
                "type": "Microsoft.Common.TextBlock",
                "visible": true,
                "options": {

                  "text": "[concat(string(steps('ApplicationCharacteristics').unitCount.value), ' was selected. ', string(div(steps('ApplicationCharacteristics').unitCount.value, 2)), ' VMs will be created.' )]"
                }
            },
            {
                "name": "sizeReview",
                "type": "Microsoft.Common.TextBlock",
                "visible": true,
                "options": {
                  "text": "Use the size selector to see how much the VMs will cost."
                }
            },
            {
                "name": "sizes",
                "type": "Microsoft.Compute.SizeSelector",
                "label": "Size",
                "toolTip": "",
                "recommendedSizes": [
                    "Standard_D32_v4",
                    "Standard_D48_v4",
                    "Standard_D64_v4"
                ],
                "constraints": {
                    "allowedSizes": [
                        "Standard_D4_v4",
                        "Standard_D16_v4",
                        "Standard_D32_v4",
                        "Standard_D48_v4",
                        "Standard_D64_v4"
                    ]
                },
                "osPlatform": "Windows",

                "count": "[div(steps('ApplicationCharacteristics').unitCount.value, 2)]",
                "visible": true
            }
          ]
        }
      ],
      "outputs": {
            "unitCount" : "[steps('ApplicationCharacteristics').unitCount.value]"
      }
    }
  }
Making a sandbox in Microsoft Partner Center
Posted by sseely in Uncategorized on February 5, 2021
One of the things those who sell through Microsoft Azure Marketplace, Azure Portal, or AppSource will note is that there isn’t a nice place to test the offer. Many people want a sandbox environment to test away while only incurring charges on their bill for Azure resources without being billed for the offer itself. Today, no sandbox exists. There are valid reasons for this, but this article isn’t going to go into those. Instead, I want to focus on how to get the ability to test away without encountering extra, unexpected charges. I will only focus on the three main transactable types in Partner Center: Software as a Service (SaaS), Azure Application: Managed Application (AMA), and Virtual Machines. The pattern is the same for all three of these.
For every offer you publish in Partner Center, you need a companion test offer. The two offers are identical in all areas except for three:
- Offer ID
- Price on plans
- Co-sell documentation (you don’t bother uploading this for the test offer)
Keep the offer IDs the same across both environments. This allows you to test your logic for provisioning or performing other actions on SaaS and AMA offers. This will also allow you to make sure that a VM which uses the Instance Metadata Service (works for Windows and Linux) to verify the running image has the right logic. It is possible that you’ll have a test case for VMs which requires running under an “unknown” plan name, just to make sure your logic for running only ‘blessed’ images works.
Any pricing on the test plans should be set to $0. In this case, not even a small $0.00001, but $0. I’ve had partners use the $0.00001 meter, then have test code cause a $10000 bill against that meter in a single month. This lets you validate units being reported to the reports in Partner Center without you being asked to pay $10000 so that Microsoft can take their processing fee and deposit the balance back in your bank account.
The test offer will contain the same text, plan IDs, descriptions, contact information, and so on. It will point to the same technical assets. The test environment will copy everything, with a couple of optional tweaks to allow development after your first publication:
- SaaS: You may choose to point the landing page and web hook to the version of the asset which is in development or test.
- AMA: Each plan will use the dev version of the zip file for the ARM template, UI Definition, and other assets. The technical configuration will also be updated. Once the test AMA is ready, these assets get copied to the production plans. You may also choose to point the Notification webhook to a test/dev version of the endpoint.
- Virtual machine: Each VM SKU will get tested. Once all is working, the URLs for the OS disk and any data disks is copied to the production instance.
Finally, when publishing the test offer, never let the offer get past the Preview stage. If you do accidentally publish a preview, test offer, you can stop selling pretty quickly (a stop sell can take up to a few hours).
Once all looks fine, copy the updated technical details to the production offer, review, and publish.
And that is how you give yourself a sandbox environment in Microsoft Partner Center.
Azure Managed Application: Customize allowed customer actions
Posted by sseely in Uncategorized on February 5, 2021
When publishing an Azure Managed Application, many ISVs choose to make some functionality available to the owner of the application. You know which of the Azure built-in roles you want to use, but you aren’t sure what actions to include. That built-in roles page also includes the list you need for Allowed control actions and Allowed data actions. Everything under Actions for the role goes into Allowed control actions. Anything under DataActions for the role goes into Allowed data actions. You just need to add the list as a semi-colon delimited list and you are good to go.
If you don’t want to read the docs and you know exactly what you want, you can also pull this information through the az cli or Azure PowerShell. To list all roles, run:
Az cli: az role definition list
PowerShell: Get-AzRoleDefinition
If you already know which role you need details on, you can run another command to get just the specifics for that role. For example, let’s say I know I need the Reader and Data Access role from Storage. I can run:
Az cli: az role definition list --name 'Reader and Data Access'
PowerShell: Get-AzRoleDefinition -Name 'Reader and Data access'
Once you have the specific role, you can then emit the right values for the control actions and data actions. This is fairly easy to do in PowerShell.
$roleDefinition = Get-AzRoleDefinition -Name 'Reader and Data access'
Write-Host "Control actions:" ($roleDefinition.Actions -join ";")
Write-Host "Data actions:" ($roleDefinition.DataActions -join ";")
ARM Templates: Pass all parameters to a script
Posted by sseely in Uncategorized on August 13, 2020
I had an interesting inquiry the other day. I was talking to a developer. She had a script which consumed most of the parameters in her ARM template. Every time she added a new parameter, she also had to remember to update the script call to pass the new parameter. She needed a mechanism to just pass all parameters to a bash script.
As a proof of concept, I just wanted to find a way to get the parameters to be saved on a Linux VM. For this, I did some looking at the various ARM template functions and noticed this one: deployment(). deployment() allows access to the ARM template and the parameters which differ in value from the parameter’s defaultValue.
To use the value, I first captured the values of interest in the ARM template variables:
"variables": {
  "uniqueParams": "[deployment().properties.parameters]",
  "defaultParams": "[deployment().properties.template.parameters]",
  "userParams": "[replace(string(variables('uniqueParams')), '\"', '\\\"')]",
  "originalParams": "[replace(string(variables('defaultParams')), '\"', '\\\"')]"
},
Please note that the above variables section was trimmed to just show the capture of the parameters. The string() function turns the object into JSON, replace() does simple string substitution. Once captured, my proof of concept then just wanted to show that the values could be passed along. To do this, I added a custom extension which would emit the data to a well known location.
{
    "type": "Microsoft.Compute/virtualMachines/extensions",
    "apiVersion": "2020-06-01",
    "name": "[concat(variables('vmName'),'/', 'RunScripts')]",
    "location": "[parameters('location')]",
    "dependsOn": [
        "[concat('Microsoft.Compute/virtualMachines/',variables('vmName'))]"
    ],
    "properties": {
        "publisher": "Microsoft.Azure.Extensions",
        "type": "CustomScript",
        "typeHandlerVersion": "2.1",
        "autoUpgradeMinorVersion":true,
        "settings": {
            "commandToExecute": "[concat('echo \"', variables('userParams'), '\" > /var/userParams.txt')]"
        }
    }
}
Once done, the following was emitted to userParams.txt:
{
  "vmNamePrefix": {
    "value": "scseely"
  },
  "vmSize": {
    "value": "Standard_DS2_v2"
  },
  "pwd": {
    "value": "p@ssw0rd"
  },
  "dnsName": {
    "value": "scseely"
  },
  "publicIPAddressName": {
    "value": "sycompscs"
  }
}
Likewise, if you need the default params as well, the file looks like this:
{
  "vmNamePrefix": {
    "type": "String",
    "metadata": {
      "description": "Assign a prefix for the VM name"
    }
  },
  "location": {
    "defaultValue": "[resourceGroup().location]",
    "type": "String",
    "metadata": {
      "description": "Select the Azure region for the resources"
    }
  },
  "vmSize": {
    "type": "String",
    "metadata": {
      "description": "Select the vm size"
    }
  },
  "userName": {
    "defaultValue": "azureadmin",
    "type": "String",
    "metadata": {
      "description": "Specify the OS username"
    }
  },
  "pwd": {
    "type": "SecureString",
    "metadata": {
      "description": "If Windows, specify the password for the OS username"
    }
  },
  "dnsName": {
    "type": "String",
    "metadata": {
      "description": "Specify the DNS name for the managed web app"
    }
  },
  "publicIPAddressName": {
    "type": "String",
    "metadata": {
      "description": "Assign a name for the public IP address"
    }
  }
}
Now, to read the file back, I can use a tool like jq to load and manipulate the JSON file in my scripts. Because the commandToExecute is just a bash command, I can stitch the emission of the JSON with scripts using ‘&&’.
Connect Application Insights to your Azure Functions App in Terraform
Posted by sseely in Uncategorized on October 17, 2019
This goes into the “notes for Scott” category, where I post things to my blog for me. I hope this is somewhat useful for you too!
I’m in the process of writing Terraform automation for an Azure Functions application I’ve built. When the deployment completed and I went to the Azure Functions application in the Azure portal (https://portal.azure.com), I got a message stating that Application Insights wasn’t connected to the Functions App:
Application Insights is not configured. Configure Application Insights to capture function logs.
The fix isn’t well documented, yet. After deploying a functions app via the portal, I found the link and it’s pretty simple: Azure Functions uses an app setting named APPINSIGHTS_INSTRUMENTATIONKEY. Just add that with the right value and things work.
To put it all together, you will deploy an app service plan, Application Insights, and an Azure Function App:
resource "azurerm_app_service_plan" "app_service_plan" {
  name                = "${var.base_name}appserv"
  location            = "${azurerm_resource_group.rg.location}"
  resource_group_name = "${azurerm_resource_group.rg.name}"
  kind                = "Linux"
  reserved            = true
  sku {
    tier = "Basic"
    size = "B1"
  }
}
resource "azurerm_application_insights" "ai" {
  name                = "${var.base_name}ai"
  location            = "${azurerm_resource_group.rg.location}"
  resource_group_name = "${azurerm_resource_group.rg.name}"
  application_type    = "web"
}
resource "azurerm_function_app" "apis" {
  name                      = "${var.base_name}func"
  location                  = "${azurerm_resource_group.rg.location}"
  resource_group_name       = "${azurerm_resource_group.rg.name}"
  app_service_plan_id       = "${azurerm_app_service_plan.app_service_plan.id}"
  storage_connection_string = "${azurerm_storage_account.az_backend.primary_connection_string}"
  https_only                = true
  version                   = "~2"

  app_settings = {
    APPINSIGHTS_INSTRUMENTATIONKEY = "${azurerm_application_insights.ai.instrumentation_key}"
  }

  site_config {
    cors {
      allowed_origins = ["https://www.${var.domain_name}"]
    }
  }
}
Upon running this, the error message went away and Azure Functions showed I had connected everything correctly.
Using AzureAD PowerShell on *nix machines (Mac, Linux)
Posted by sseely in Uncategorized on December 6, 2018
The Azure Active Directory team has a lot of great command line tooling. This is available in the Azure Cloud Shell (from the portal) as well as via the AzureAD PowerShell package. The .NET Core version of the PowerShell package is still in development, but is available for us to use as needed. I’ve had to show a few folks how to do this on my team, so I’m recording the steps here as my “notes”. Run all these from an elevated PowerShell session (sudo PowerShell).
- Add the PowerShell Test Gallery. This gallery is a test site and may go down for any reason. The command to make it available is:
Register-PackageSource -Trusted -ProviderName 'PowerShellGet' -Name 'Posh Test Gallery' -Location https://www.poshtestgallery.com/api/v2/'
- Import the package using this command.
Install-Module AzureAD.Standard.Preview
For what it’s worth, I installed PowerShell onto my Ubuntu box using the information over here.
If you need the Azure PowerShell module too, run
Install-Module Az
Public Notes: Running Python in Azure Batch on Windows using the Azure Portal
Posted by sseely in Uncategorized on July 19, 2018
TLDR; This post explains how to setup an Azure Batch node which uses Windows using installers. It also explains how to use application packages to preload Azure Batch nodes with utilities so that tasks can just be command lines. The explanation use case is “run a Python script”, but should apply more broadly to “install tools, distribute stuff, and run command lines.”
PDF Version of this article (which has a bit better formatting)
When I start experimenting with something, I do not start out with writing code to automate everything. Sometimes, I try to use a GUI to bootstrap my process, then automate when setup is correct. Why? A lot of environments, like Azure, will allow for fast cycles from the UI tools. My latest adventure took a bit of time, so I’m documenting what I did.
Here’s the context: I am developing a mid-sized example project for scalability. If everything goes to plan, the demo will show how to solve the same problem with Azure Batch and the Azure Kubernetes Service. The demo is targeting a special kind of data scientist: an actuary. Actuaries frequently write code in one of three languages: APL, Python, and R. I’m focusing on Python.
My goals:
- Configure everything through the Azure portal.
- Install Python on the batch node at startup.
- Use the application packages feature to deliver the Python virtual environment prior to any tasks running.
- Run a command line without resources to make sure I can run a script in the Python virtual environment.
What follows is essentially a lab for you to follow and do the same things I did. As time marches forward, this lab’s correctness will degrade. Hit me up on LinkedIn if you catch this and I may go back and update the details.
For all the Azure pieces, try to keep things in the same region. I’ll be using East US. This isn’t necessary, but is helpful for the parts that transfer files. Staying in the same region gives better speed.
1 Create a new project in PyCharm
- Open up your editor; I’m using PyCharm. Details for other editors will differ. Set the location to wherever you like. I’m naming the project BatchDemo.
- Setup a New environment using Virtualenv. The location will be in the venv directory of your project. For the base interpreter, use the one installed on your machine already.
For me, the dialog looks like this:

- Click on Create.
- Add a new file, addrow.py, to the project in the BatchDemo directory.
- Add the library to use table storage.
- Select File–>Settings–>Project: BatchDemo–>Project Interpreter.
- In the list of packages, you’ll see a plus sign ‘+’. Click on that.
- Select azure-cosmosdb-table. Click on Install Package.
- Close the Available Packages window once done. My machine looked like this before I closed the window:

- Click OK on the Settings Window. You should now have a number of packages installed.
- Add the following code to the addrow.py file. The code is fairly “Hello, world!”-ish: add a row to a Table Storage table (using libraries from the azure.cosmosdb namespace, but interacts with Storage, so no, not intuitive). The script is simple and adds one row to a table named tasktable:
from azure.cosmosdb.table.tableservice import TableService
import datetime

def main():
    table_name = 'tasktable'
    table_service = TableService(
        account_name="<your Azure Storage Account Name>",
        account_key="<your Azure Storage Account Key>")

    if not (table_service.exists(table_name)):
        table_service.create_table(table_name)
    task = \
        {
            'PartitionKey': 'tasks',
            'RowKey': str(datetime.datetime.utcnow()),
            'description': 'Do some task'
        }
    table_service.insert_entity(table_name, task)

if __name__ == "__main__":
    main()
For the highlighted code, take the name of one of your Azure Storage Accounts and a corresponding key, then plug in the proper values. If you need to create a storage account, instructions are here. To get the keys, look in the same doc (or click here) and follow the instructions. If you create a new storage account, use a new resource group and name the resource group BatchPython. We’ll use that group name later too.
One last comment here: for a production app, you really should use Key Vault. The credentials are being handled this way to keep the concept count reasonably low.
Test the code by running it. You should be able to look at a table named tasktable in your storage account and see the new row. The RowKey is the current timestamp, so in our case it should provide for a unique enough key.
Once you have all this working and tested, let’s look at how to run this simple thing in Azure Batch. Again, this is for learning how to do some simple stuff via a Hello, World.
2 Create a batch account
In this step, we are going to create a batch account which I’ll refer to as batch_account in here; your name will be different. Just know to substitute a proper string where needed.
- In the Azure portal, click on Create a resource.
- Search for Batch Service. Click on Batch Service, published by Microsoft.
- Click on Create.
- Account name: For the account name, enter in batch_account [remember, this is a string you need to make up, then reuse. You’re picking something unique. I used scseelybatch]
- Resource Group: Select BatchPython. If you didn’t create this earlier, select Create New.
- Select a storage account to use with batch. You can use the same one you created to test the table insertion.
- Leave the other defaults as is.
- Click on Create.
3 Upload the Python Installer
Upload the Python installer which you want to use. I used the Windows x86-64 executable installer from here.
- In your storage account, create a container named installers.
- In the Azure Portal, navigate to your Storage Account.
- Select Blob ServiceàBrowse Blobs
- Click on + Container.
- Set the Name to installers.
- Click on OK.
- Once created, click on the installers container.
- Upload the Python installer from your machine.
- Click on Upload.
- In the Upload blob screen, point to your installer and click on Upload.
- Wait until the upload completes.
- Get a SAS URL for the installer.
- Right click on the uploaded file.
- Select Generate SAS.
- Set the expiration of the token to some time in the future. I went for 2 years in the future.
- Click on Generate blob SAS token and URL
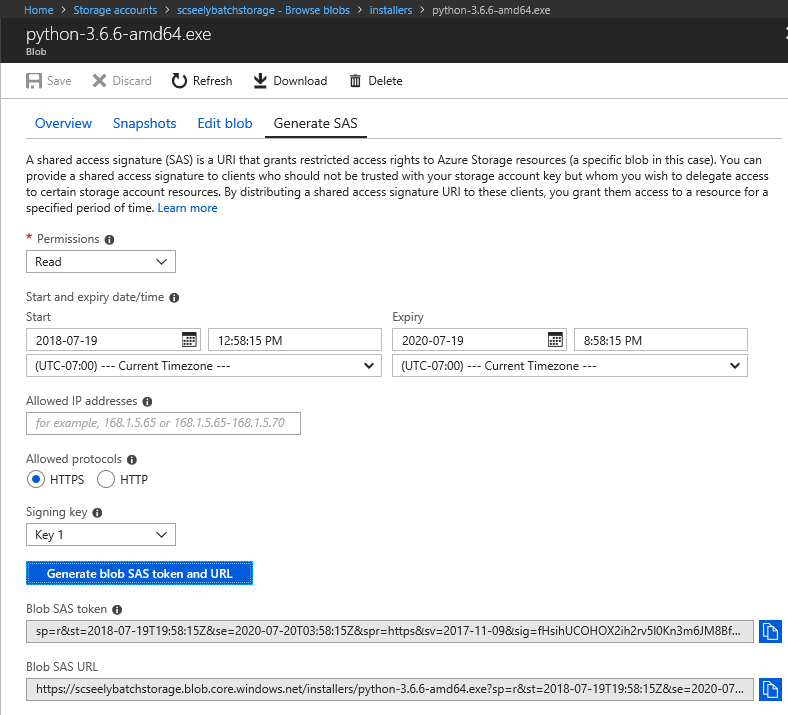
Copy the Blob SAS URL. Store that in a scratch area. You’ll need it in a bit.
4 Create a Batch Application
- Going back to your machine, go to the BatchDemo directory which contains your addrow.py file along with the virtual environment. Zip up BatchDemo and everything else inside into a file called BatchDemo.zip. [Mine is about 12MB in size]
- Open up your list of Resource Groups in the portal. Click on BatchPython.
- Click on your Batch account.
- Select FeaturesàApplications
- Click on Add.
- Application id: BatchPython
- Version: 1.0
- Application package: Select BatchPython.zip
- Click on OK.
The file will upload. When complete, you’ll have 1/20 applications installed.
- Click on BatchPython.
- Set Default Version to 1.0.
- Click on Save.
5 Create a Batch Pool
- Open up your list of Resource Groups in the portal. Click on BatchPython.
- Click on your Batch account.
- Select on FeaturesàPools
- Click on Add.
- Pool ID: Python
- Publisher: MicrosoftWindowsServer
- Offer: WindowsServer
- Sku: 2016-Datacenter
- Node pricing tier: Standard D11_v2 [Editorial: When experimenting, I prefer to pick nodes with at least 2 cores. 1 for the OS to do its thing, 1 for my code. I’ll do one core for simple production stuff once I have things working. This is particularly important to allow for effective remote desktop/SSH. The extra core keeps the connection happy.]
- Target dedicated nodes: 1
- Start Task/Start task: Enabled
- Start Task/Command Line: We want this installed for all users, available on the Path environment variable, and we do not want a UI.
python-3.6.6-amd64.exe /quiet InstallAllUsers=1 PrependPath=1 Include_test=0
- Start Task/User identity: Task autouser, Admin
- Start Task/Wait for success: True
- Start Task/Resource files:
- Blob Source: Same as the URL you saved from the piece labeled “Upload the Python Installer”. The SAS token is necessary.
- File Path: python-3.6.6-amd64.exe
- Click on Select
- Optional Settings/Application packages
- Click on Application Packages.
- Application: BatchPython
- Version: Use default version
- Click on Select
- Click on OK.
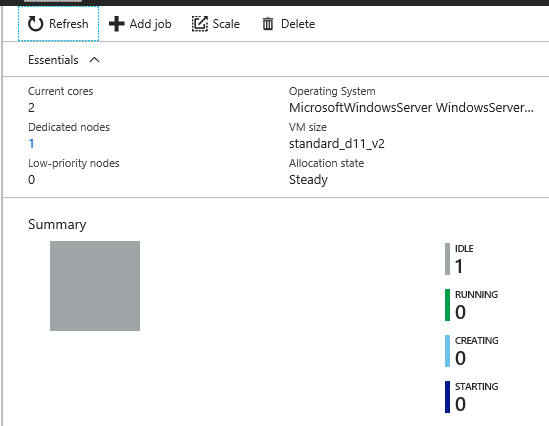
The pool will be created. In my experience, creating the pool and getting the node ready can take a few minutes. Wait until the node appears as Idle before continuing.
6 Run a job
- Open up your list of Resource Groups in the portal. Click on BatchPython.
- Click on your Batch account.
- Select on FeaturesàJobs
- Click on Add
- Job ID: AddARow
- Pool: Python
- Job manager, preparation, and release tasks:
- Mode: Custom
- Job Manager Task:
- Task ID: AddARowTask
- Command line:
cmd /c %AZ_BATCH_APP_PACKAGE_BATCHPYTHON%\BatchDemo\venv\Scripts\python.exe %AZ_BATCH_APP_PACKAGE_BATCHPYTHON%\BatchDemo\addrow.py
Note on the environment variable: Application packages are zip files. Batch puts the location of the unzipped application package into an environment variables in one of two ways, depending on if you select the default version or a specific version.
Default: AZ_BATCH_APP_PACKAGE_
Versioned: AZ_BATCH_APP_PACKAGE_
- Click on Select
- Click on OK
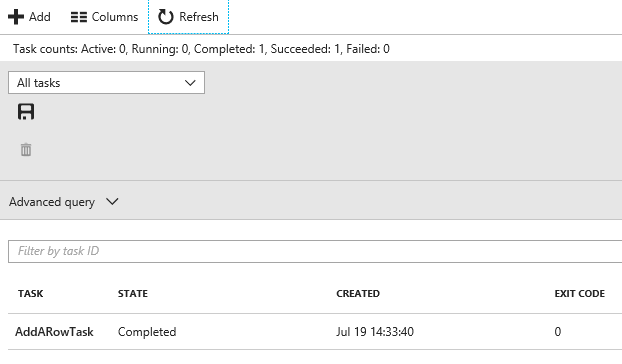
The job should start running immediately. Because it’s a short task, it’ll finish quickly too. Click on Refresh and you’ll probably see that the AddARowTask has completed.
You can then verify the output by opening up the table and looking at the rows. A new one should be present. I’ll expect a row that completed near 21:33 on July 19; the time will be recorded as UTC, and I’m in Redmond, WA, USA, which is 7 hours behind UTC time.

That view is courtesy of the Azure tools present in Visual Studio 2017.
7 So, what next?
Now that you’ve done all this, what does it mean? For your batch pools, you could preload them with a common toolset. The resource files you pass in to a job can be files to operate on, independent of binaries. Your tasks start times can be greatly reduced by loading the prerequisites early. Could you do this with custom VMs? Sure, but then you need to keep the VMs patched. This mechanism allows you to use a patched VM and just install your few items.
This is definitely a toy example, meant to show how to do the initial setup in the portal. Here’s what you want to do for automation purposes:
- Script all of this.
- For the Python piece, add a mechanism to create the zip file after you have a successful build and test.
- Script the management of the binaries, creating the Batch Service, and configuring the pools and application package(s).
- Add an integration test to validate that the pool is ready to run.
- Minimize the number of secrets in the code to 0 secrets. Use Key Vault to manage that stuff.

You must be logged in to post a comment.